Miscellaneous.
The miscellaneous section is intended to provide members with information and advice on various issues or items of interest relating to the RKKA. Members are invited to contact the unit CO and moderator, if they have a specific request or a feature for inclusion in this section.
Contents.
1. Winter Clothing.
2. Soviet Camouflage.
3. Plashch Palatka.
4. Palatka.Squad Tent 10 man.
5. Shinel "Skatka" bedroll.
6. Portyanki.
7. How to tie the myeshok.
8. Using the Mosin Nagant rifle cleaning kit.
9. The Soldiers Army book.
The list of contents is not exhaustive as new items can be added in the future.
1. Winter clothing.
Schapka ushanka.
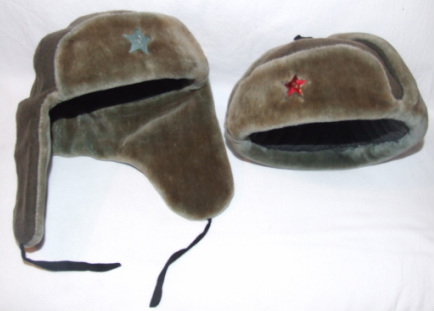 Shapka ushanka winter hat.
|

Interior of Obr 1940 ushanka. Wartime patterns are distinguished by the ribbed stitching on the sides and the diamond shaped stitching tram lines on the crown (usually 3 lines of stitching.
|
Introduced by order of the USSR People's Commissar of Defense No. 187 of July 5, 1940. GOST No. 1076-4.
A fur cap with ear covering flaps that can be tied up to the crown of the cap, or fastened at the chin to protect the ears, jaw, and lower chin during cold weather conditions. Introduced in 1940 to replace the Budenovka winter schlem, which proved to be ineffective against extreme cold weather, as encountered by the Soviets during the Winter War with Finland in 1939-40. The ushanka was supposedly based on the Finnish Army M1939 turkislakki fur caps.
One of the archetypal images during the Great Patriotic War was of the Red Army soldier wearing a fur cap.
Enlisted men's caps were made from a synthetic material and was jokingly referred by the soldiers as being made from "fish fur", i.e. bearing no resemblance to fur from any animal. Officer caps were of a better quality made from lambswool or astrakhan. The synthetic fur hats came in various shades and colours, but followed a basic pattern in shape and appearance. A 32 mm red enamelled/painted or subdued green cap star was affixed to the front flap of the hat.
Schapka ushanka (шапка ушанка) in Russian literally means " ear flap hat", from the word "уши" meaning ears.
Vatniks. Vatnaya Telogreika & Vatnaya Sharovari.
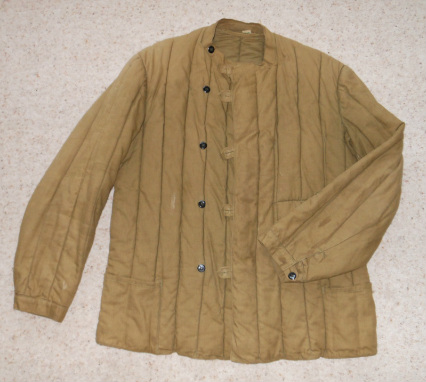
M43 Telogreika, front showing button & loop arrangement.
|
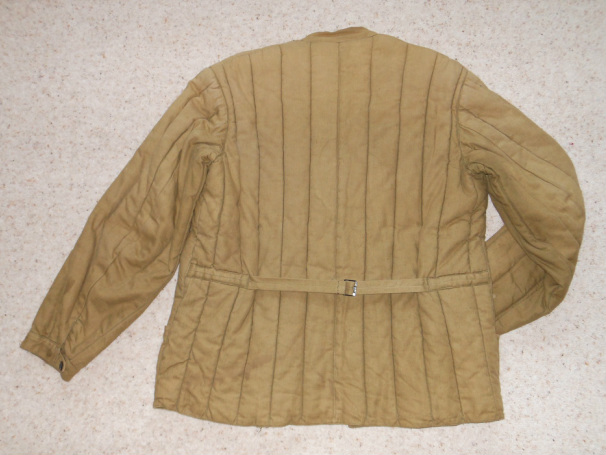
M43 Telogreika. rear showing belt arrangement.
|
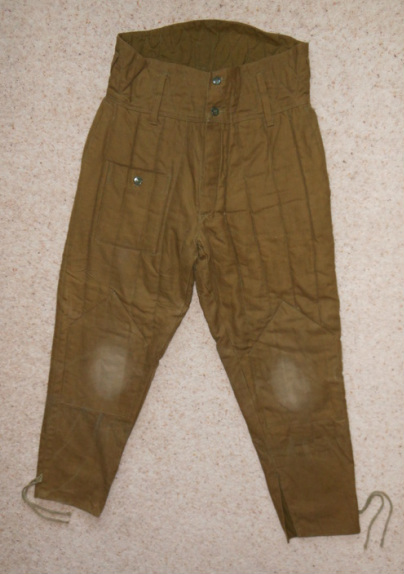
Vatni sharovari, front showing waist, thigh pocket and knee reinforcing detail.
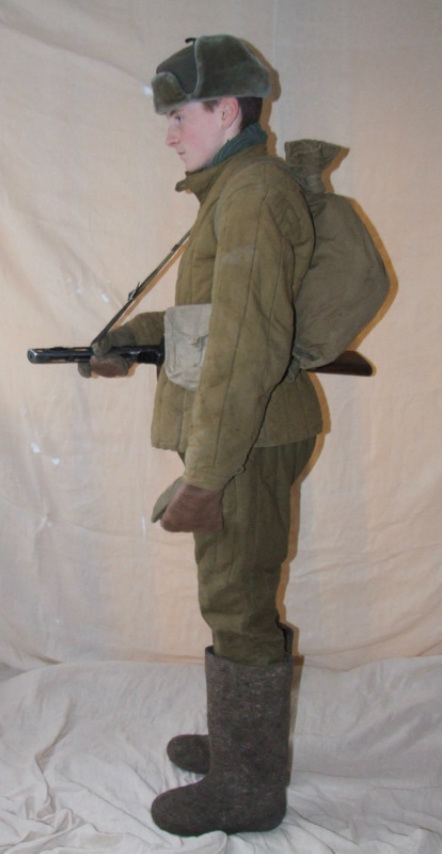
The Vatniks winter uniform was approved by the Committee for Standardization of the USSR NKLP on October 8th, 1932. The Vatniks comprised of a quilted jacket (Vatnaya Telogreika) and quilted breeches (Vatnaya Sharovary), which was introduced into service by the end of 1932. In 1935 the Vatniks were improved with higher quality production standards. During the war two types of Telogreika (padded jacket) were in use,namely M1941 and M1943, which were similar in appearance. The early pattern M1941,had a fall collar similar to the M1935 gimnastiorka and with two belt loops on the rear of the jacket. This pattern was only issued during 1941-42. The M1943 jacket had a short stand up collar with a half belt and adjustment buckle on the back. Both pattern jackets had an external pocket on each hip and a single internal pocket on the left breast. The jacket cuff was closed with a single button. Telogreika literally in Russian means "body warmer" and it was intended to be worn over the wool issue gimnastiorka and under the greatcoat, hence the telogreika had no external insignia. However, the M1943 jacket was commonly seen worn in the field with shoulder boards by senior NCOs and Officers. It was favoured in lieu of the greatcoat as it increased mobility in combat, particularly when fighting in urban built up areas. |
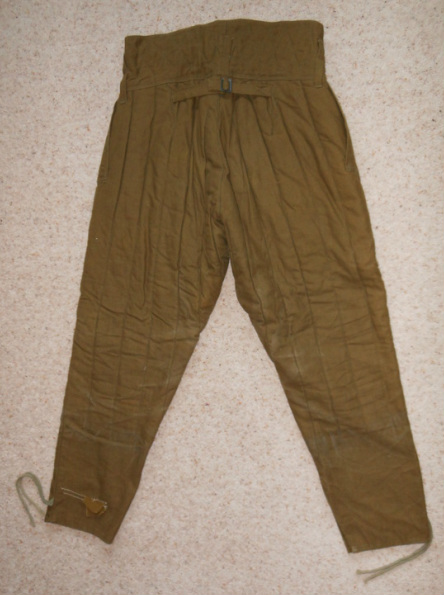
Vatnie sharovari, rear showing belt detail and ankle tie tapes.
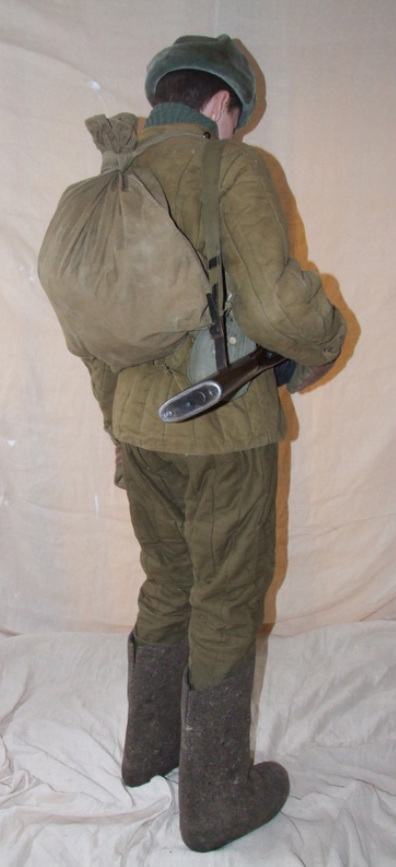
The Vatnie sharovari (padded trousers) had a pocket on each hip and some patterns were made without reinforced knee patches. The former issue Soviet sharovari generally available to re-enactors have the single external pocket on the right thigh for the first aid dressing, which was a post war addition. A vent and half belt and buckle was on the back for adjustment. In the above images the ushanka hat, mittens, a wool knit "Podschlemnik" balaclava hat worn as a neck muffler and valenki felt boots complete the winter attire. |
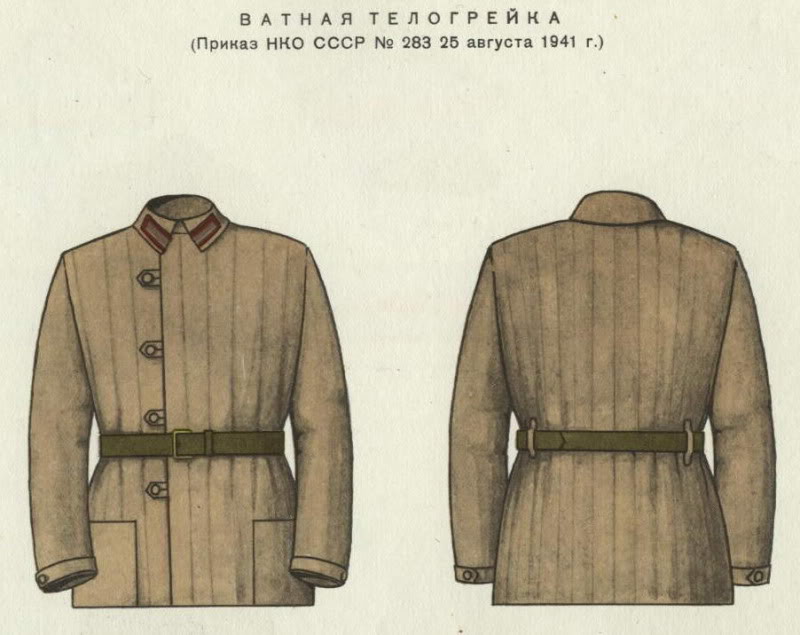
Vatnaya Telogreika (Prikaz (Order) NKO CCCP No, 283 25th August 1941 ) Image from the original RKKA uniform and clothing manual.
|
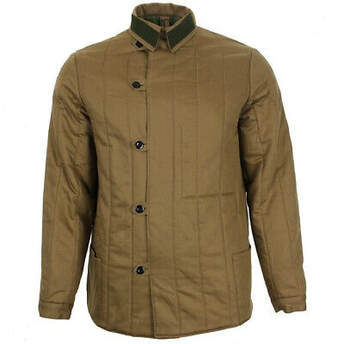
A modern day reproduction of the M1941 telogreika.
|
Valenki or felt boots.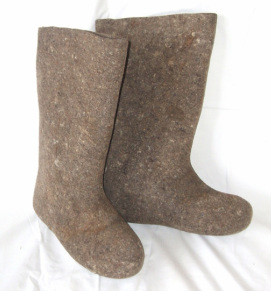
Valenki boots were made from compressed felt and were only suitable for use in temperatures well below freezing. In thawing conditions they would soak up moisture and would be rendered useless. Rubber galoshes over shoes (Galoshie)were also worn to protect the soles. Straw, paper and extra foot wraps could be worn to further insulate the feet. 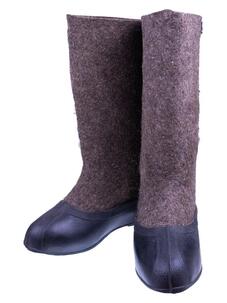
Valenki worn with rubber galoshes overshoes. |
Mittens.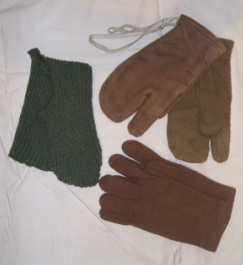
Mittens (Rukavyetze) had a finger incorporated so the wearer could operate the trigger on a weapon. They also had a felt backing, used to wipe condensation from the wearers face. Pre war gloves (Perchatkye) were of a grey wool knit, from 1939 they were of a beige/brown wool knit.
A wool knitted "balaclava" type hat (Podschlemnik) may also have been worn to further protect the wearers head. 
A pair of (Galoshie) rubber galoshes over shoes. Prior to fitting, the galoshes were usually submerged in hot water to soften the rubber and were then stretched over the valenki. As the galoshes cooled they shrank to a tight fit.
|
Podschlemnik woollen knit "balaclava" helmet.
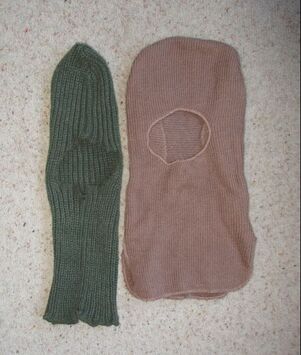
Podschlemnik, woollen knit "balaclava" helmet. Right:: Standard issue, which had additional internal insulation for ears and back of the neck. Left: a simple economy made helmet, both of which could be pulled down around the neck as a muffler. Both types could be rolled up and worn "watch cap" style.
|
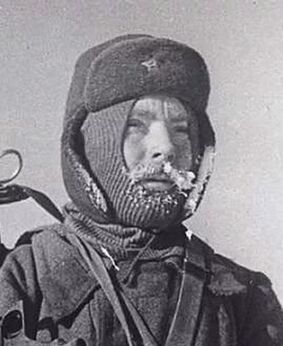
A Frontovik wearing a podschlemnik under his ushanka hat.
|
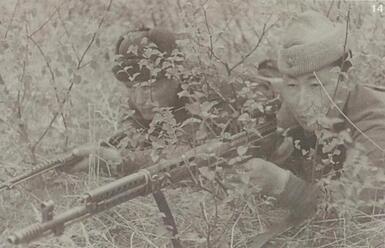
Image of a sniper team, one wearing the podschlemnik rolled up "watch cap" style. Note the subdued pattern capstar affixed to the front of the cap. He is armed with a SVT 40 rifle with a PU telescopic sight.
|
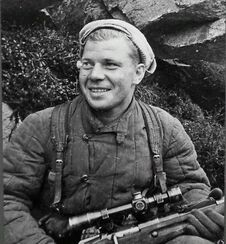
Hero of the Soviet Union Semyon Agafonov of the 181st reconnaissance detachment, wearing the podschlemnik "watch cap" style. He is armed with a Mosin Sniper rifle fitted with a PE telescopic sight.
|
Bekesha Tulup.

The Bekesha winter coat (sometimes referred to as a Tulup) was originally issued during the later Russian Imperial Army period and in the current form with the RKKA as a military garment in 1931. It was made of shearling sheep skin, with the fleece worn on the inside. It had six buttons and loops and was fastened at the front right side. The buttons were large so that the wearer could easily fasten it up wearing mittens or gloves. There is a pocket on each hip. Buttons and loops were sometimes on the shoulders so that pogonii could be worn. It was issued to both Officers and Enlisted men. As noted from wartime accounts, the coat was very susceptible to lice infestation, particularly in static defence situations!
The RKKA designation of the coat was referred to as a Polushubok, as shown in period manuals and individual equipment issue records (see below Soldiers Army Book,page 9)
Note: The Shuba is a traditional long Russian coat originating from medieval times and made from animal fur often reaching down to the wearers ankles. They were made in two styles, either worn with fur facing inside, for warmth, or with the fur facing outside, for show and prestige by the wearer! The shorter version of the same coat was known as a polishubok.
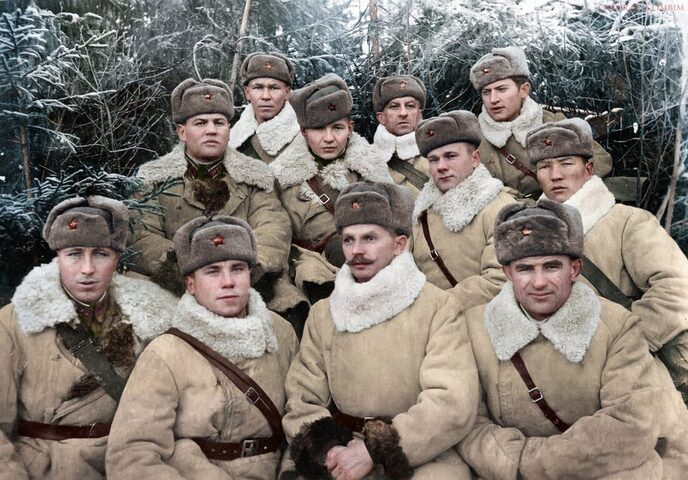
A fine posed field image of a group of Red Army officers each wearing bekesha winter coats.
2. Soviet Camouflage clothing.
The Soviet Union and the Red Army were early exponents of camouflage clothing and as early as 1919 had initiated research and development and also established a school for instruction on camouflages methods, or as 'masking' as it was referred by the Soviets. By 1927 three basic types of suits were in use, consisting of large hooded smocks and trousers in green/brown colours to reflect seasonal change. One example also had sponges painted to look like foliage glued all over the suit.
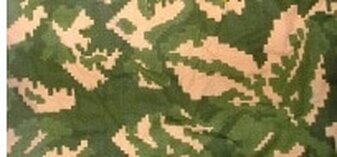
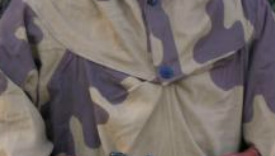
In 1938 a new type pattern suit was issued, distinguished by its large splotches, or the "amoeba" pattern as it has became to be known. It came in various colour schemes for the relevant seasons and in two different cuts. The MK (Maskirovochniy Kombinezon) was a one piece coverall and the MKK (Maskirovochniy Kamuflirovanniy Kostum) was a two piece suit. Both types were of a thin loose fitting material with a large hood attached, designed to be worn over the standard uniform and equipment. Some patterns had a face veil attached to the hood and others had a separate face veil mask.
There were twelve known amoeba colour schemes i.e зеленый (цвет но.2) green colour No.2, which had four background shade variations from dark, mid to light green, each with its own amoeba shapes of one colour, either dark,mid and light brown or in black. зеленый (цвет но.5), green colour No.5, which had two variations of a brighter light green background each with amoeba shapes in one colour, either dark and mid brown. осенний (цвет но.3) autumn colour No.3, which had three background colour variations, two in autumnal green/brown each with amoeba shapes in one colour, either dark or mid brown and a third colour background of autumnal beige with black amoeba shapes. песочный (цвет но.4) Sand colour No.4, with a yellow/tan coloured background with amoeba shapes in one colour of light brown. горный mountain,
supposedly a reversible item in two schemes for mountain terrains i.e. background in a slate grey colour with amoeba shapes in black and on the reverse side, a background in lighter steel grey colour with amoeba shapes in dark grey. However,
this type was not in common use.
Another pattern, the Mochalniy, a dark green suit which had tufts of simulated string/raffia grass attached and loops for fixing local foliage all over the suit.
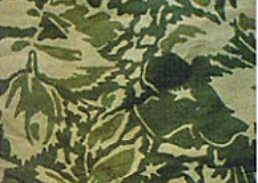
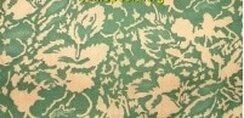
In 1941 a two coloured leaf patterned suit was introduced and was referred to as letniy kamuflyazh (summer leaf camouflage), which was produced in at least two variations (green or grey/brown). In 1944 a three coloured block deceptive pattern was also introduced. In 1945 by a further variation was seen, which was basically the 1944 pattern suit with an overprint of brown amoeba shapes in the same style as the 1938 pattern suit. This 1945 pattern suit was not widely in use and the amoeba shapes may have been applied to the 1944 suits "in the field" and were apparently not encountered after 1950.
The MK and MKK suits were issued to snipers, scouts (Razvedchiki), combat engineers and reconnaissance troops of other arms.
Pre and early war issue to troops in the field was a personal camouflage net. It measured 150 cm x 75 cm and was used to conceal individual positions and weapons together with foliage. Also produced was a camouflage fringe made from raffia to simulate grass, measuring about 3 metres long, with hooks/loops at the ends, so it could be attached to the wearers uniform or equipment. Several could be attached together to conceal larger items.
Winter camouflage.
There were two patterns of winter camouflage during the war. The later pattern was a two piece hooded suit, similarly cut to the above described MKK suit, but with mitten/glove covers attached to the sleeve cuffs. The earlier pattern was a one piece hooded smock that reached to the wearers ankles which was fastened at the front by tie tapes and could be worn over the greatcoat. Both types were generously cut so that the wearer could wear a helmet and field equipment underneath. Also,in the field rudimentary winter camouflage covering could be fashioned from white linen or bedding materials.
During the war the Germans produced several reports on Soviet camouflage and concealment practices for information and also to be adopted by their own forces in the field. It was generally acknowledged that the Soviets were far more adept than the Germans on the subject.
In 1938 a new type pattern suit was issued, distinguished by its large splotches, or the "amoeba" pattern as it has became to be known. It came in various colour schemes for the relevant seasons and in two different cuts. The MK (Maskirovochniy Kombinezon) was a one piece coverall and the MKK (Maskirovochniy Kamuflirovanniy Kostum) was a two piece suit. Both types were of a thin loose fitting material with a large hood attached, designed to be worn over the standard uniform and equipment. Some patterns had a face veil attached to the hood and others had a separate face veil mask.
There were twelve known amoeba colour schemes i.e зеленый (цвет но.2) green colour No.2, which had four background shade variations from dark, mid to light green, each with its own amoeba shapes of one colour, either dark,mid and light brown or in black. зеленый (цвет но.5), green colour No.5, which had two variations of a brighter light green background each with amoeba shapes in one colour, either dark and mid brown. осенний (цвет но.3) autumn colour No.3, which had three background colour variations, two in autumnal green/brown each with amoeba shapes in one colour, either dark or mid brown and a third colour background of autumnal beige with black amoeba shapes. песочный (цвет но.4) Sand colour No.4, with a yellow/tan coloured background with amoeba shapes in one colour of light brown. горный mountain,
supposedly a reversible item in two schemes for mountain terrains i.e. background in a slate grey colour with amoeba shapes in black and on the reverse side, a background in lighter steel grey colour with amoeba shapes in dark grey. However,
this type was not in common use.
Another pattern, the Mochalniy, a dark green suit which had tufts of simulated string/raffia grass attached and loops for fixing local foliage all over the suit.
In 1941 a two coloured leaf patterned suit was introduced and was referred to as letniy kamuflyazh (summer leaf camouflage), which was produced in at least two variations (green or grey/brown). In 1944 a three coloured block deceptive pattern was also introduced. In 1945 by a further variation was seen, which was basically the 1944 pattern suit with an overprint of brown amoeba shapes in the same style as the 1938 pattern suit. This 1945 pattern suit was not widely in use and the amoeba shapes may have been applied to the 1944 suits "in the field" and were apparently not encountered after 1950.
The MK and MKK suits were issued to snipers, scouts (Razvedchiki), combat engineers and reconnaissance troops of other arms.
Pre and early war issue to troops in the field was a personal camouflage net. It measured 150 cm x 75 cm and was used to conceal individual positions and weapons together with foliage. Also produced was a camouflage fringe made from raffia to simulate grass, measuring about 3 metres long, with hooks/loops at the ends, so it could be attached to the wearers uniform or equipment. Several could be attached together to conceal larger items.
Winter camouflage.
There were two patterns of winter camouflage during the war. The later pattern was a two piece hooded suit, similarly cut to the above described MKK suit, but with mitten/glove covers attached to the sleeve cuffs. The earlier pattern was a one piece hooded smock that reached to the wearers ankles which was fastened at the front by tie tapes and could be worn over the greatcoat. Both types were generously cut so that the wearer could wear a helmet and field equipment underneath. Also,in the field rudimentary winter camouflage covering could be fashioned from white linen or bedding materials.
During the war the Germans produced several reports on Soviet camouflage and concealment practices for information and also to be adopted by their own forces in the field. It was generally acknowledged that the Soviets were far more adept than the Germans on the subject.
|
|


Amoeba suit.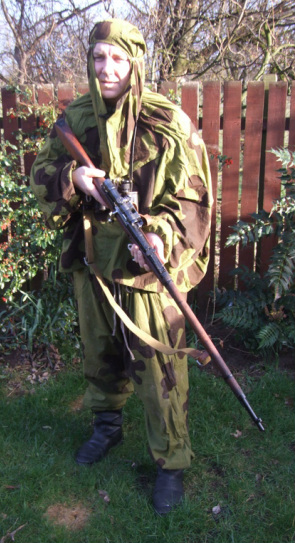 A 1938 pattern MKK two piece 'amoeba' suit.
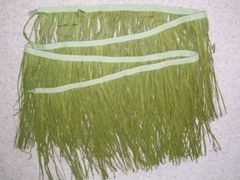
Pre/early war camouflage fringe. Reconstruction by S. Vanlint, 2nd Guards.
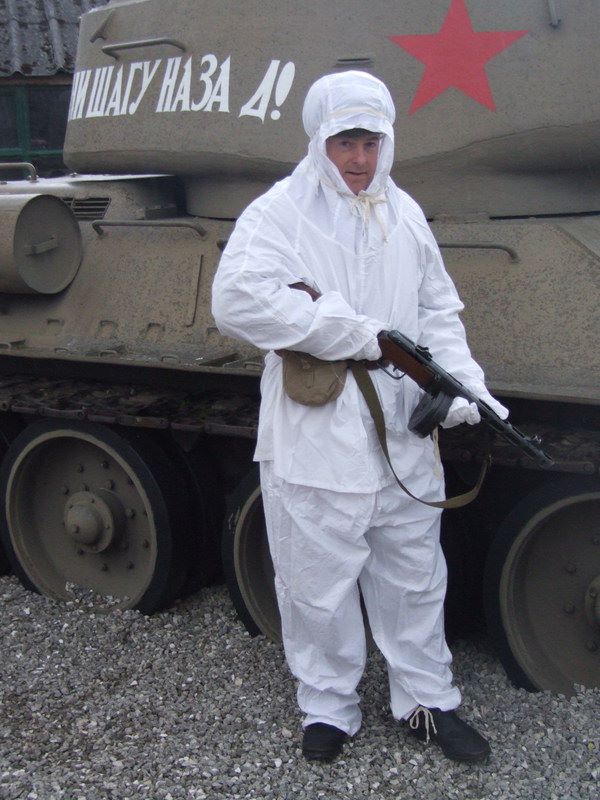
Two piece winter camouflage suit.
|
1944 three coloured block patterned suit.
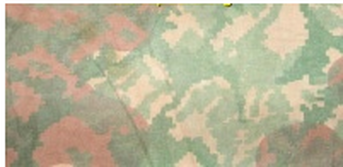
1945 block pattern with amoeba overprint pattern.
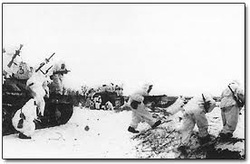
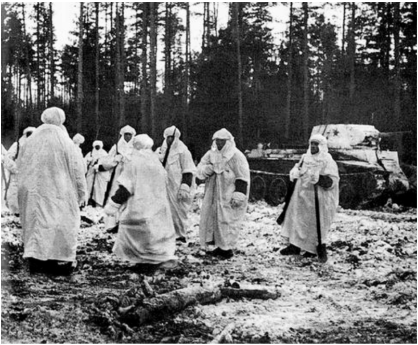 1941 Soviet troops wearing one piece winter greatcoat coverall. Note: in the field, coloured cloth arm bands were worn to distinguish "friendly" units from enemy units, who may be similarly attired in winter camouflage. |
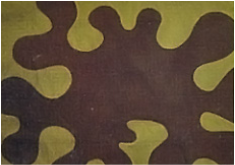


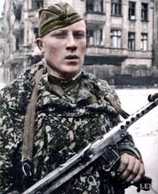
A period image of the 'Mochalniy' camouflage suit.The wearer is armed with a AVS 36 self loading rifle.
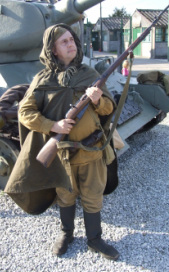
3. Plashch Palatka or raincoat/tent shelter.
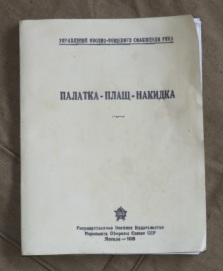
Instructions for the use of the plashch palatka are taken from the original manual: Palatka-Plashch-Nakidka, Moscow dated 1938.
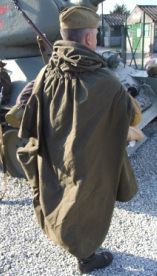
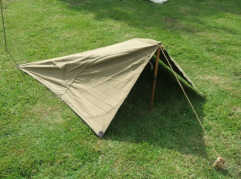
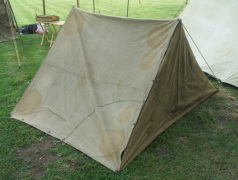
The plashch palatka (in Russian means: raincoat/tent) provided the Red Army soldier rudimentary protection from the elements. Simple in design, versatile and practical, it is an essential item for use in the field for any Soviet re-enactor of the GPW period.
It was used for sleeping in, a rain cape with a hood, it could be fashioned into a basic lean to or a tent shelter for one person or combined with other capes to accommodate 2,4,6 or more persons, used for casualty evacuation or for weather proofing in dugouts and trenches etc
There was an officers version of the rain cape, called a Plashch Nakidka. It was made of the same material as the plashch with tie cords at the neck, a detachable hood and an arm vent on each side of the front of the cape. However, it could not be adapted for use as a tent or lean to shelter like the enlisted men's plashch palatkas.
|
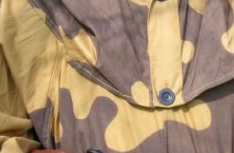
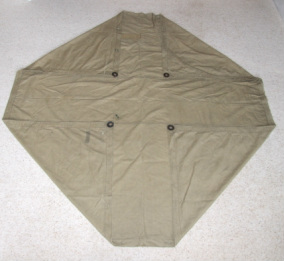
On the inner side of the cape near the centre is a single wooden toggle. When worn as a rain cape, the toggle is used to secure the bottom corner by the grommet, which otherwise the bottom corner of the cape would tend to drag on the ground.
|
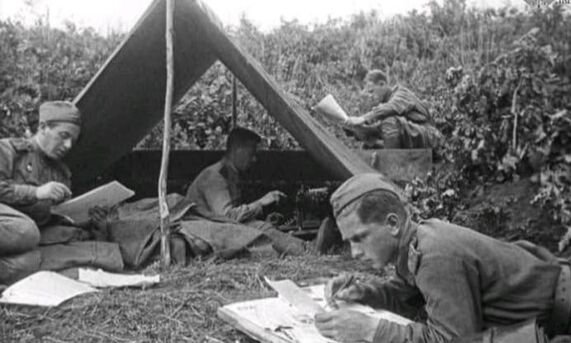
An image of the 13th Guards Political Section, purportedly taken late summer 1943. Note: the plasch shelter is set up over a trench, to provide additional comfort and protection.
Folding the plashch.
|
|
3.
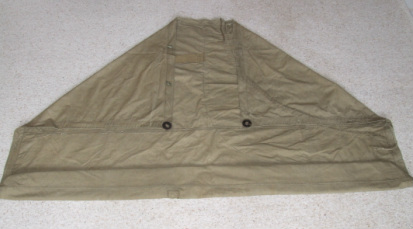
Fold the cape over and smooth out so it is flat.
|
4.
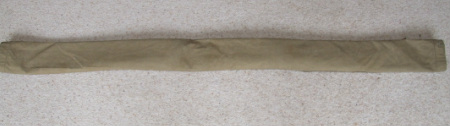
Finally, fold the cape over in half so that the ends meet and secure with a strap or a length of rope.
|
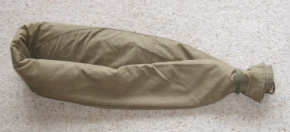
4.палатки лагерные. Camp Tents.
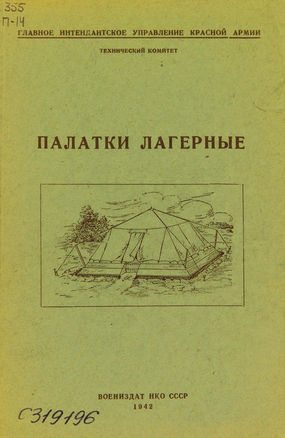
1942 manual for instructions on erecting Commission Camp Tent and Camp Tent Red Army.
|
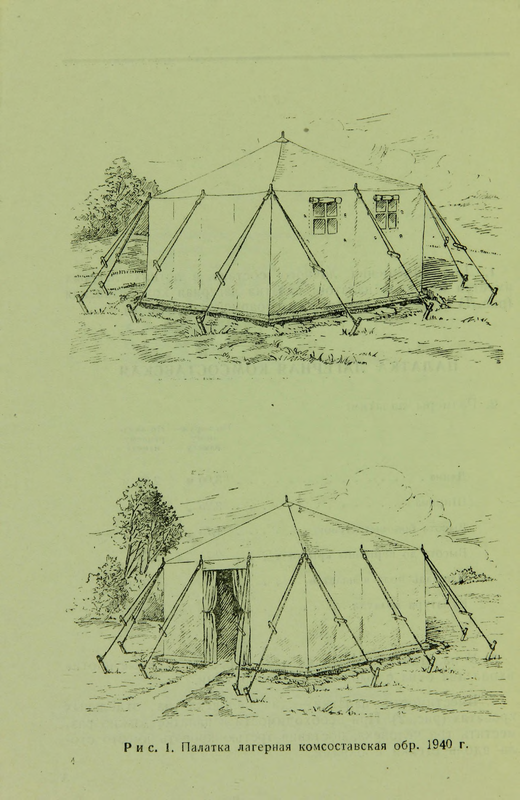
Images from manual of Commission Camp Tent showing front and rear veiw.
|

Image from manual showing tent plan for two persons and its components.
|
There was a variation of canvas tents in use by the Soviets during the war for different purposes i.e personnel, command, large medical/surgical stations etc. To accommodate personnel in summer camps there were two types of tents.
1.ПАЛАТКА ЛАГЕРНАЯ КОМСОСТАВСКАЯ (PALATKA LAGERNAYA KOMSOSTAVSKAYA). Translates as CAMP TENT COMMISSION. The tent has one entrance and located opposite there are two windows with removable frames. Tent capacity - two people on separate beds, if necessary, three people can be accommodated in the tent, placing a third bed instead of a table along the side with the windows. Dimensions: 3.13 mtr X 2.88 mtr, side walls 1.75 mtr, roof height 2.70 mtr. This type of tent was likely for use by unit commanders.
ПАЛАТКА ЛАГЕРНАЯ КРАСНОАРМЕЙСКАЯ (PALATKA LAGERNAYA KRASNOARMEYSKAYA). Translates as CAMP TENT RED ARMY.
Instructions for the erection of this tent are as Order N K O No. 170 of 1940. The images below are of the Soviet Palatka (in Russian meaning tent or pavilion) which was in use during the war and was capable of accommodating a section of up to 10 soldiers or 12 soldiers when used as a rest tent. It was generally used in rear echelon units and training establishment encampments and would not have likely been encountered in direct front line circumstances.
Erected solely as a rest tent,only platforms were installed to accommodate 12 sleeping soldiers. The tent could also be used as a banya(sauna),using hot fire heated coals/stones in an iron griddle and cold water was applied to create steam.Earth would have been heaped around the tent edges to prevent heat loss.
There were three methods of erecting the palatka. In the case of a unit operating in a mobile situation, it could be erected directly on a level ground surface as a normal tent, which could be taken down rapidly as required. At its base the palatka measured 4x4 metres and at its highest central point it had a 2.4 mtr long pole. Each of the four corners was held erect by external poles of 1.6 mtr long, each had a groove on its top to retain the guy rope in place, which were tensioned and lashed to metal stakes into the ground.The sides of the palatka were secured with wooden pegs into the ground and earth was usually embanked around the tent edges.
When the encampment was used in semi-permanent circumstances, there were two methods of erecting the palatka.
1.The tent was erected over a recessed earthwork. Firstly, a recess 4x4 metre square by 30-40 cm deep was dug out. The earth spoil is embanked and compacted around the outer edge of the recess to a height of 30-40 cm high, thus giving a total inner recess depth of 60-80 cm. The walls of the recess were reinforced with wooden planking and stakes and raised wooden plank sleeping platforms for 10 soldiers were fitted. In this case, a 2.9 mtr long central tent pole was used and the external corner poles were embedded into the earth embankment. Internally, access steps, a weapon rack, a cast iron stove with chimney and in one corner a basic trestle table and bench was installed. If the table and bench were omitted a bed platform for two extra soldiers could be accommodated.
2.The tent was erected over a wooden internal planking frame with an an external sloping planking surface which was installed directly on the ground, as shown in the images below. The interior fittings were the same as the recessed tent. This method was the usual method of erection during winter months.
During the winter months the palatka was also insulated. Straw mats 7-10 cm thick, woven in the shape of the roof and side panels were stitched onto the outer side of the palatka panel seams. Another palatka canvas was laid directly over the insulating panels, which were then sandwiched between the inner and outer canvasses, ensuring the entrances and guy ropes were correctly aligned and corresponded. On frozen ground, the floor was insulated with straw mats or a layer of moss, with the exception of the area where the stove is installed. To fully construct a winter insulated 10 man palatka over a recessed earth took between 8-10 hours. An iron portable camping stove with a spark catcher was installed.
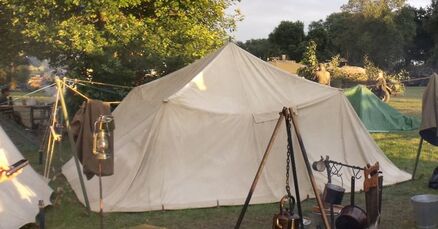
Image of a palatka erected in summer months for temporary use. It could be erected and dismantled by a squad of soldiers in 10-15 minutes.
|
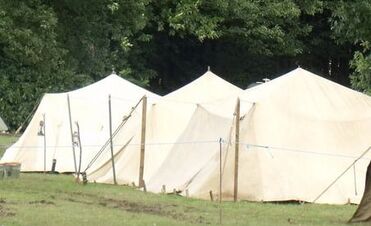
A platoon of soldiers in the field could be housed in 3-4 palatkas in platoon lines. It was usual practice to dig small ditches around the base of the palatka to aid drainage in the event of heavy rainfall.
|
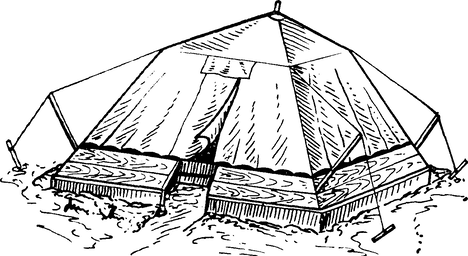
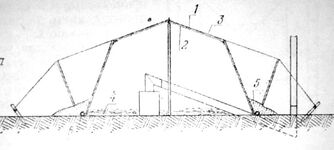
Image from training manual of the Palatka on how it was to be erected over the sloped wooden frame installed directly on ground surface. This was the usual method for winter months.
|
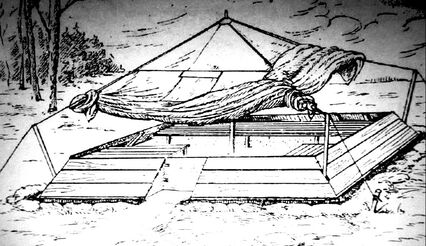
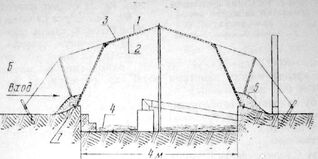
Image from training manual showing how the Palatka was raised for drying and airing the floor, which was carried out periodically.
|
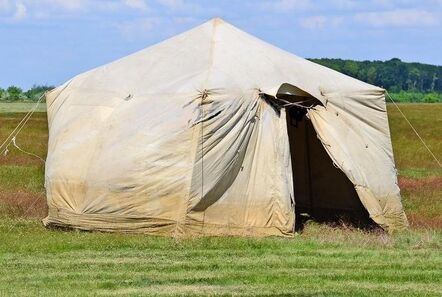
When pitched on a flat surface It was not uncommon to see the palatka with the corner poles erected inside each corner. The poles would likely impinge on the internal space, but the side panels would tend to stand more erect. This method was likely used for unit command purposes.
|
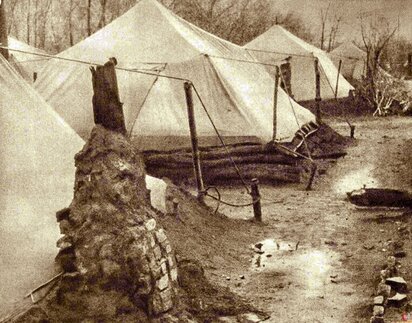
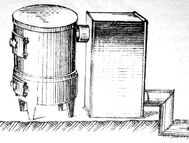
Image of a semi permanent rear echelon or training encampment in Uzbekistan during the war. Note that logs have been added to the earth embankment to strengthen it, which would have been susceptible to erosion during periods of heavy rainfall. In the foreground is the stove chimney which has been strengthened with compacted earth and stones. An iron stove with a spark catcher and 4 linear metres of chimney piping with two elbows was provided.Fire was always a risk in tented encampments and the use of stoves was strictly regulated.
|
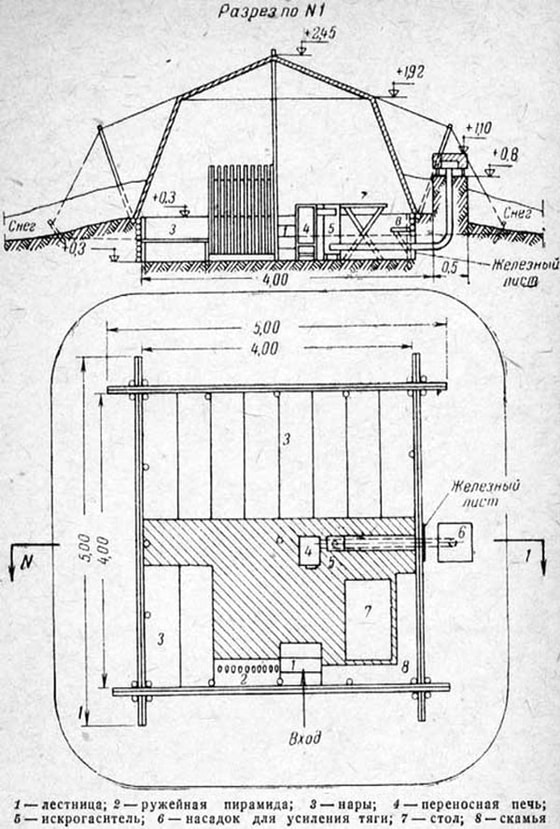
Plan and side elevation image from an official period RKKA manual showing the dimensions and how the palatka was to be erected for insulated winterized conditions. Key: 1. Entrance steps. 2. Weapon rack. 3. Raised bunk platform with storage space for below each bunk for personal equipment. 4.Portable cast iron stove. 5. Spark catcher. 6. Chimney flue. 7. Table. 8. Bench. Note: the side elevation image shows the tent outline in cross hatch marking,denoting the winter insulating material and also shows in Russian cursive writing the word for snow (снег/snyeg), which was compacted at the palatka base for further insulation and wind resistance. To prevent fires, the chimney flue was routed through the earth embankment in a recessed tent and below ground on a ground surface erected tent.Whilst it would have probably been sufficiently warm, with a 10 men section inside it would have been somewhat claustrophobic for prolonged winter periods!
During the hot weather conditions of the summer months the tents did not warrant the installation of a stove.
Below: Images from the training manual of how to install the stove chimney. Left to Right: on level ground surface, a recessed earthwork and the portable stove with spark catcher attached.
During the hot weather conditions of the summer months the tents did not warrant the installation of a stove.
Below: Images from the training manual of how to install the stove chimney. Left to Right: on level ground surface, a recessed earthwork and the portable stove with spark catcher attached.
|
|
|
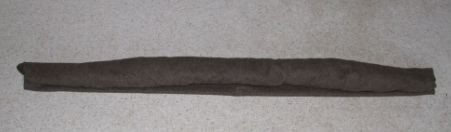
5. Shinel "Skatka" bedroll.
The Shinel greatcoat was carried by the Red Army soldier in the field throughout the year and was not just a winter issue item. When in the field, the greatcoat was used together with the plasch palatka to form a basic individual sleeping arrangement,usually in conjunction with local materials for insulating the ground surface. Depending on the terrain and season, materials such as grass,shrubs,hay and moss were used and in forested or wooded areas, leaves,pine needles and small branches were utilized. In winter, snow was cleared to the ground surface and a combination of branches,foliage,leaves, moss etc was used to create an elevated sleeping platform. Also, for extra warmth,two soldiers would combine their respective greatcoats and plasches and "buddy buddy up" for extra warmth!
When not in use the greatcoat was worn bedroll fashion over the left shoulder, so as to allow the soldier to fire his weapon from the right shoulder. This was known as a "Skatka" and often personal items were carried within the bedroll as on occasions a backpack was not issued to the soldier.
Post war greatcoats appear to be cut slightly differently from wartime coats, however the method of rolling the skatka remains unchanged.It was often seen being worn with the ends of the bedroll tucked into the early pattern mess tin cook pot
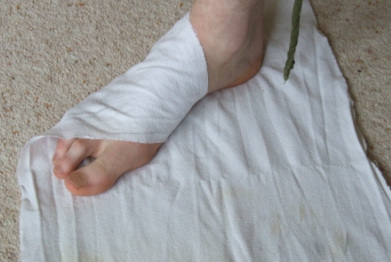
HOW TO FOLD THE SHINEL INTO A SKATKA.
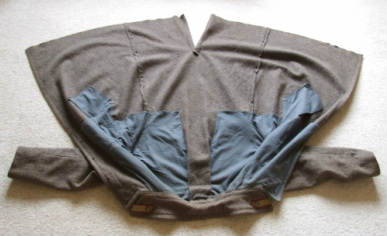
1. Unfasten the left button of the half belt (Hylastic) on the back of the greatcoat. Lay the greatcoat on the ground with the inner side uppermost. Spread out the skirts, sleeves and collar and smooth out the pockets and coat liner so they are flat.
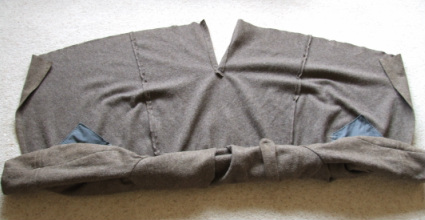
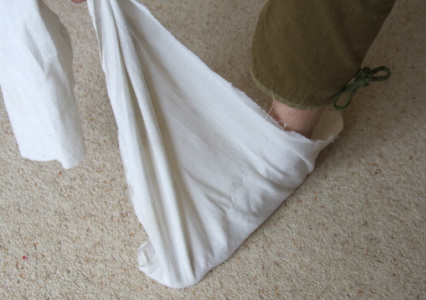
2. Roll the coat, start by folding the collar and out stretched sleeves towards the waist line. Fold the outer corner of each skirt of the coat so as to be in line with the end of each outstretched sleeve cuff as shown.
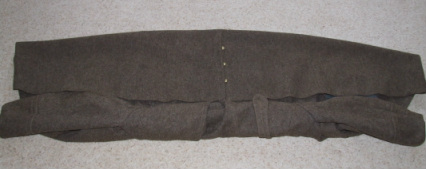
3. Fold the bottom edge of the coat in towards the waist seam so that the rear coat vent is on the folded upper side as shown.
4. Tightly roll from the sleeve end of the coat until the bottom edge is reached. I have found you can get a neater tighter finish if two persons roll the coat.
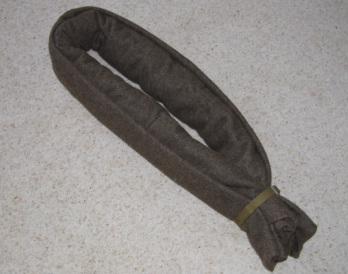
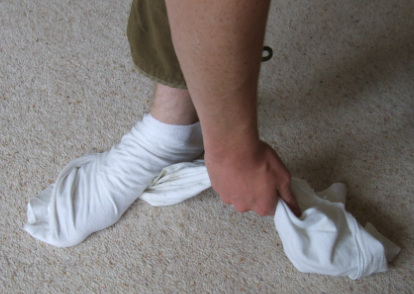
5. Finally, fold the rolled coat in half so the folded bottom edge is uppermost as shown and secure the ends with a strap. The rain cape can be secured with straps to the outer side of the greatcoat or the coat can be rolled within the cape.
When not in use the greatcoat was worn bedroll fashion over the left shoulder, so as to allow the soldier to fire his weapon from the right shoulder. This was known as a "Skatka" and often personal items were carried within the bedroll as on occasions a backpack was not issued to the soldier.
Post war greatcoats appear to be cut slightly differently from wartime coats, however the method of rolling the skatka remains unchanged.It was often seen being worn with the ends of the bedroll tucked into the early pattern mess tin cook pot
HOW TO FOLD THE SHINEL INTO A SKATKA.
1. Unfasten the left button of the half belt (Hylastic) on the back of the greatcoat. Lay the greatcoat on the ground with the inner side uppermost. Spread out the skirts, sleeves and collar and smooth out the pockets and coat liner so they are flat.
2. Roll the coat, start by folding the collar and out stretched sleeves towards the waist line. Fold the outer corner of each skirt of the coat so as to be in line with the end of each outstretched sleeve cuff as shown.
3. Fold the bottom edge of the coat in towards the waist seam so that the rear coat vent is on the folded upper side as shown.
4. Tightly roll from the sleeve end of the coat until the bottom edge is reached. I have found you can get a neater tighter finish if two persons roll the coat.
5. Finally, fold the rolled coat in half so the folded bottom edge is uppermost as shown and secure the ends with a strap. The rain cape can be secured with straps to the outer side of the greatcoat or the coat can be rolled within the cape.
 1. |
 2. |
 3. |
 4. |
5.
|
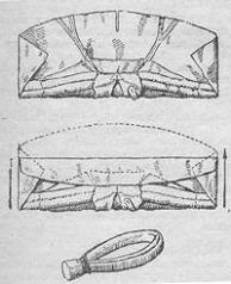
Image from original manual.
|
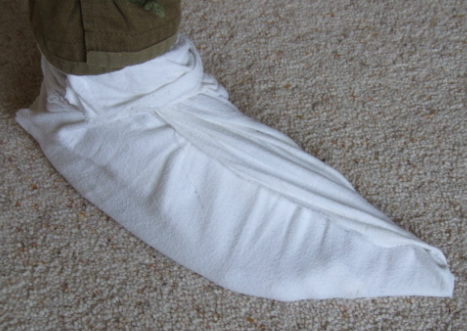
6. Portyanki foot wraps.
Portyanki (Portyanka-singular) were purportedly introduced to the Imperial Russian Army after Peter the Great visited the Netherlands and saw Dutch soldiers wearing foot wraps in the early 1700's. They have remained in service with the Russian soldier until partially abandoned in the military reforms of 2007. They were finally consigned to history in 2013 and were replaced by the issue of socks.
There are some advantages to wearing foot wraps as opposed to socks. Portyanki better support the foot and air trapped in the folds better insulate the foot. Also, when wet they can be dried quicker than traditional socks. Wrapping the portyanki is a difficult technique to perfect and getting it wrong can cause some discomfort. However, once perfected, they are extremely comfortable to wear and obviate the need to perhaps wear several pairs of socks with sapogi boots.
Portyanki could be made from a medium weight linen material for summer use and a warmer thicker cotton or flannel material for winter use. Regulations stipulated that the wraps measured 35 x 90 cm. During summer months when the thinner foot wraps were in use, insoles were worn with boots to take up any looseness in fitting to avoid chaffing and blistering!.
Tip: I have found that a cotton or flannel bed pillow cover is most suitable, which I cut along the sides and end to make a pair of foot wraps. In the past I have sometimes I had to wear 1-2 pairs of socks to get a good fit of my sapogi boots. I have found if I wear one pair of socks with portyanki a really comfortable fit can be achieved. If your boots are a tighter fit then just wearing the portyanki will suffice.
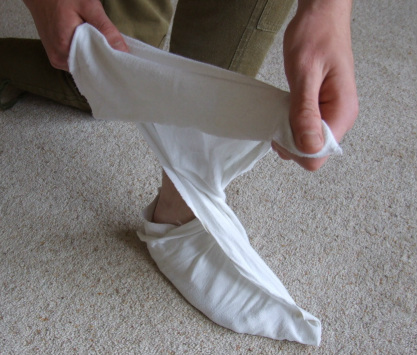
1.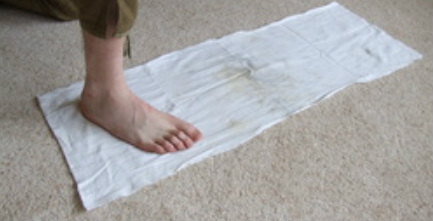
Lay the portyanka on a flat surface. For the right foot, place the foot at the right end of the cloth. For the left foot, place the foot at the left end. Note how the foot is angled on the cloth ie, heel towards the right rear corner of the cloth. |
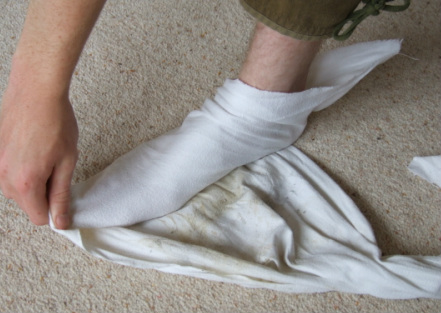
2.
Fold the top right corner of the cloth over the foot and neatly tuck under the arch of the foot, ensuring there are no creases. |
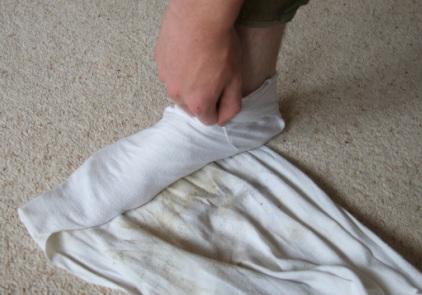
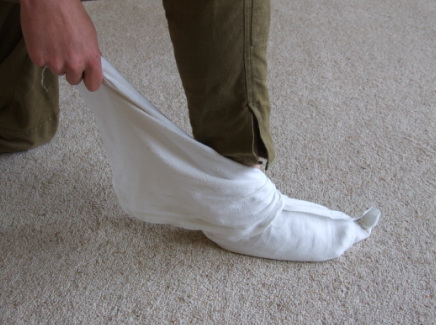
3.
With the right hand pull the cloth tightly over the top of the foot, but not so tight so as to interfere with blood circulation of the foot. 5.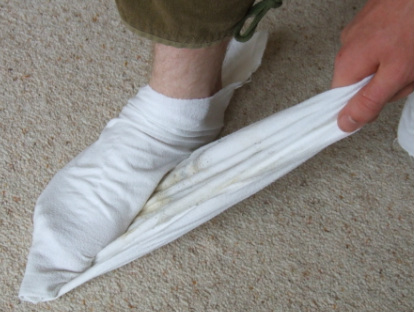
Raise the foot slightly onto the heel and pull the cloth under the entire length of the foot. |
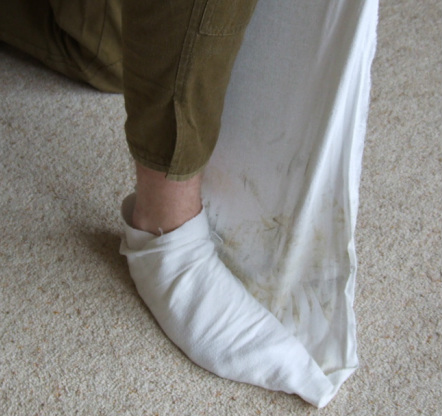
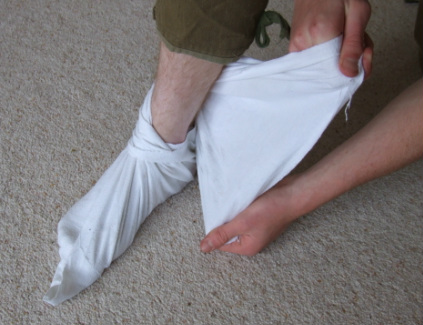
4.
Raise the foot slightly onto the ball of the foot and pass the cloth under the heel. 6.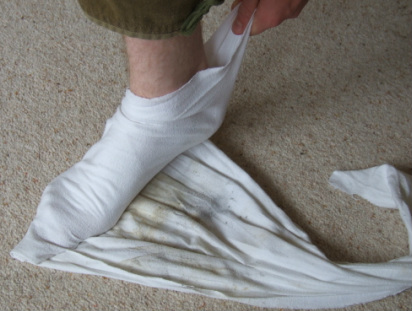
Raise the heel slightly and pull the cloth at the back of the heel to smooth out any creases under the heel. |
7.
Repeat the procedure and pull the cloth at the toes to smooth out any creases under the toes and arch of the foot.
|
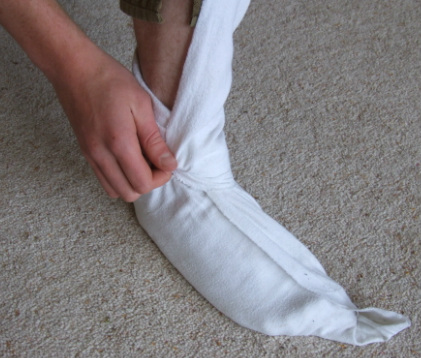
8.
Fold the loose cloth behind the foot along the inner side of the ankle as shown. |
9.
With the left hand holding the left corner and the right hand the right corner as you look down at the cloth, pull the cloth end upwards to tighten around the foot. Again not so tight that it interferes with blood circulation. |
10.
This is the difficult bit! With the right hand wrap the cloth corner around the outside of the ankle and around the back of the lower calve. At the same time with the corner of the cloth in the left hand, twist that corner downwards and around the back of the ankle. The left corner of the cloth should now be lower than the right corner.
|
11.
Maintain the tension on the cloth with the right hand. Release the cloth in the left hand and with the right hand pull the cloth around the back of the calve. From the inner side of the foot, with the left hand reach behind the ankle to grasp the loose corner of the cloth you have just released. |
12.
With the left hand tightly pull and wrap the remaining loose cloth around to the front of the ankle.
|
13.
Tuck the loose end of the cloth under the fold around the ankle to secure |
14.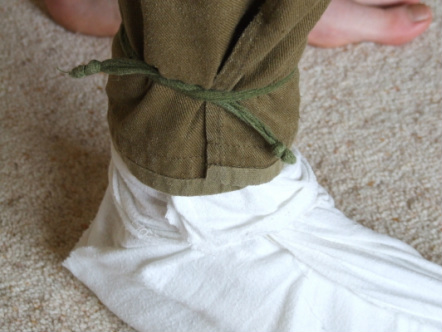
Pull the bottom of the sharovari leg over the top of the portyanki and secure the trouser cords with a single tie as though you would start to tie a shoe lace.
|
15.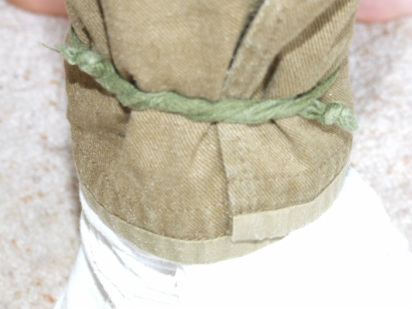
Pass the loose ends of the trouser cord around the tie cord as shown. This method will allow some movement of adjustment around the calve, rather than a knot which is more restrictive to the bottom of the sharovaris. |
16.
Looks and sounds complicated and for the left foot it is exactly the same, only a mirror image of the same method. With a little practice you will find after a few tries you will soon achieve a comfortable fit and if you forgive the pun, "one more step towards authenticity!"
If anyone wants to have a go wearing portyanki, come and see John at one of the events, who will be happy to go through it with you. Alternatively, a good demonstration can be viewed at: www.youtube.com/watch?v=E5SqkrODGII |
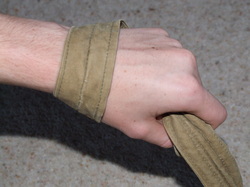
7. How to tie the myeshok.
1.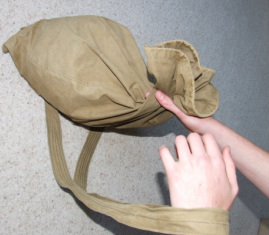
Place the shoulder strap loop over the back of the left hand as shown and gather in the top of the myeshok in the right hand. |
2.
Grasp both straps in the left hand as shown. |
3.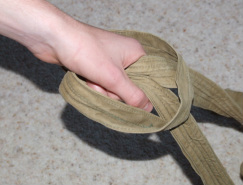
Slip the strap over the back of the left hand and over the straps as shown. |
4.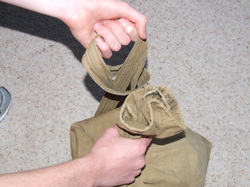
Form a slip loop large enough to push the gathered end of the myeshok through the loop. |
5.
Hold the myeshok and pull the straps to tighten as shown. |
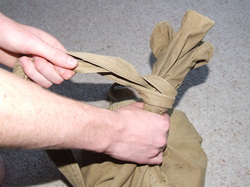
6.
Myeshok ready to wear. |
8. Using the Mosin Nagant rifle cleaning kit.
The instructions in this section are intended for field maintenance only and do not extend beyond that ie, as carried out by an armourer for servicing and repair etc. After firing, the weapon should be cleaned immediately or as soon as possible as the blank charges we use are particularly corrosive to the bore. It is recommended that all external debris and dirt should be removed from the rifle firstly, before proceding to cleaning the barrel. The barrel should be oiled on the final pull through and thoroughly so if the weapon is to be stored for some time. Weapon cleaning after firing will be incorporated into our living history displays where appropriate.
Cleaning kit.
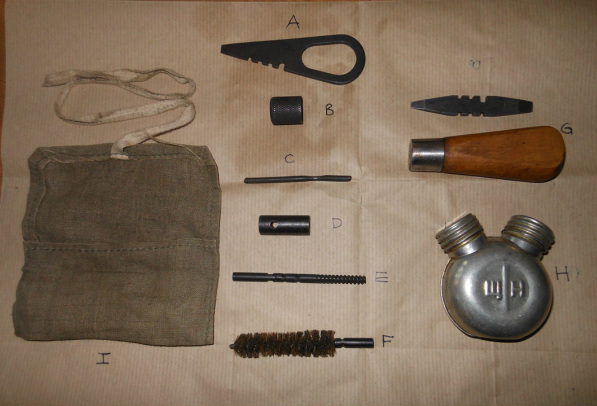
A. Combination tool.
B. Muzzle protector.
C. Metal stock with flattend section.
D. Cleaning rod tube.
E. Cleaning jag.
F. Cleaning brush. (not always included in kit)
G. Pre-early war combination tool.
H. Oil bottle (dual compartments)
I. Canvas tool pouch.
Although not included as standard with the cleaning kit, it is useful to have a small stiff bristled brush to use to remove debris and dirt from the areas around the breech, trigger and magazine etc.
The oil bottle is marked with the Cyrillic characters which denotes the type of lubrication in each compartment, щ & н
Щ "масло щелочная" (Maslo Shchelochnaya) base oil. H " масло Hейтральное" (Maslo Nyootralnoye) neutral oil.
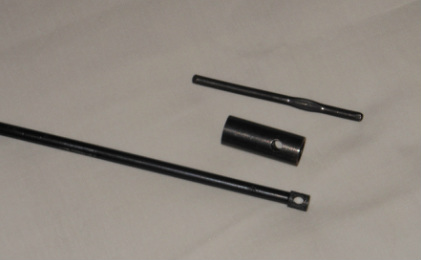
Remove the cleaning rod and bolt from the rifle firstly. The cleaning rod tube and metal stock are required to assemble the ' T ' piece.
|

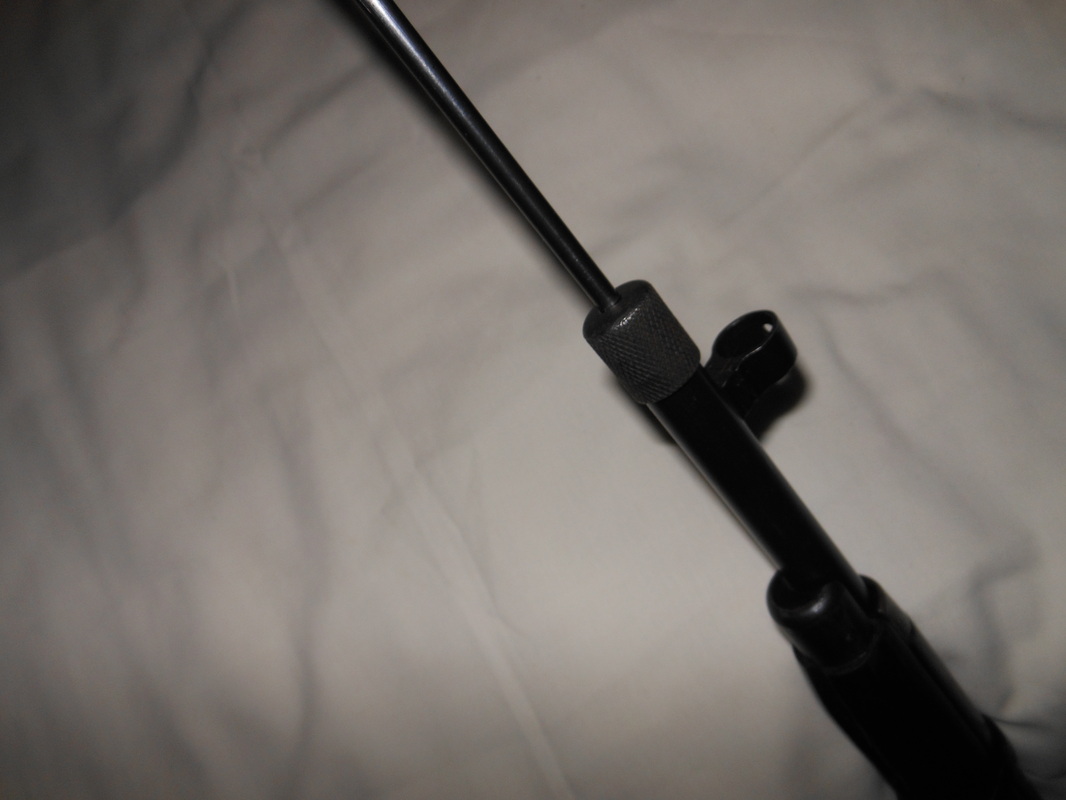
From the threaded end of the rod, slide the larger aperture of the tube to the knurled end of the rod. Align the holes on the tube and rod.
|
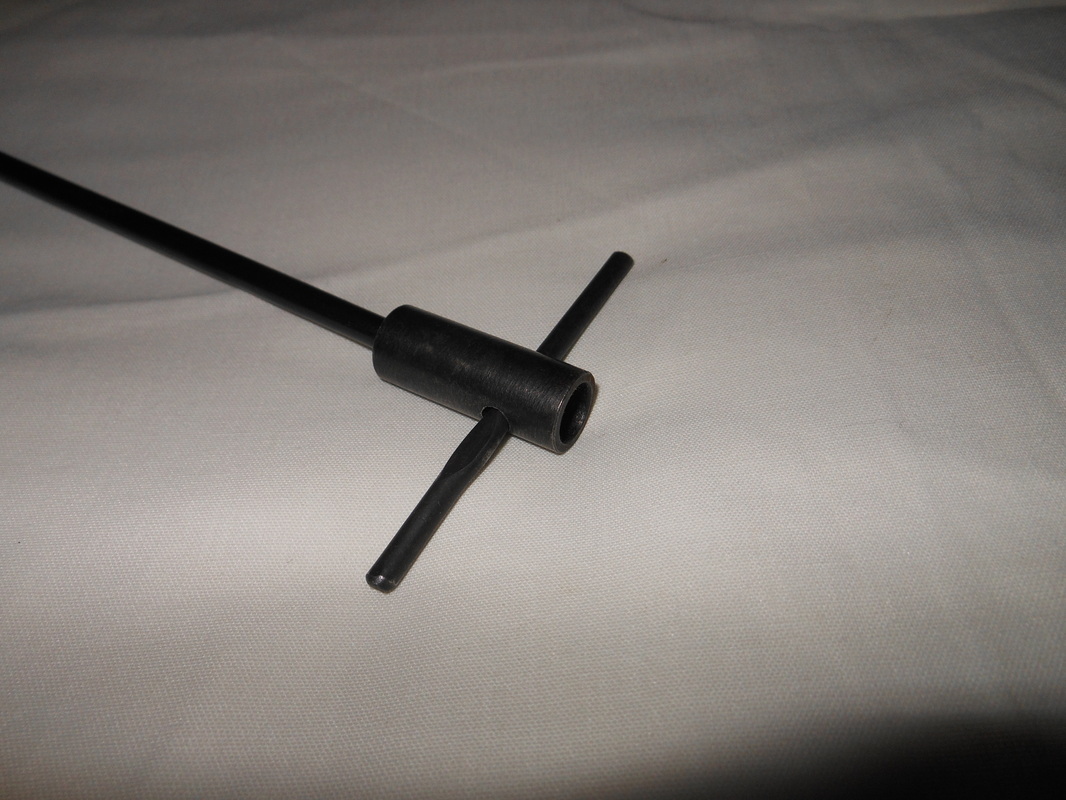
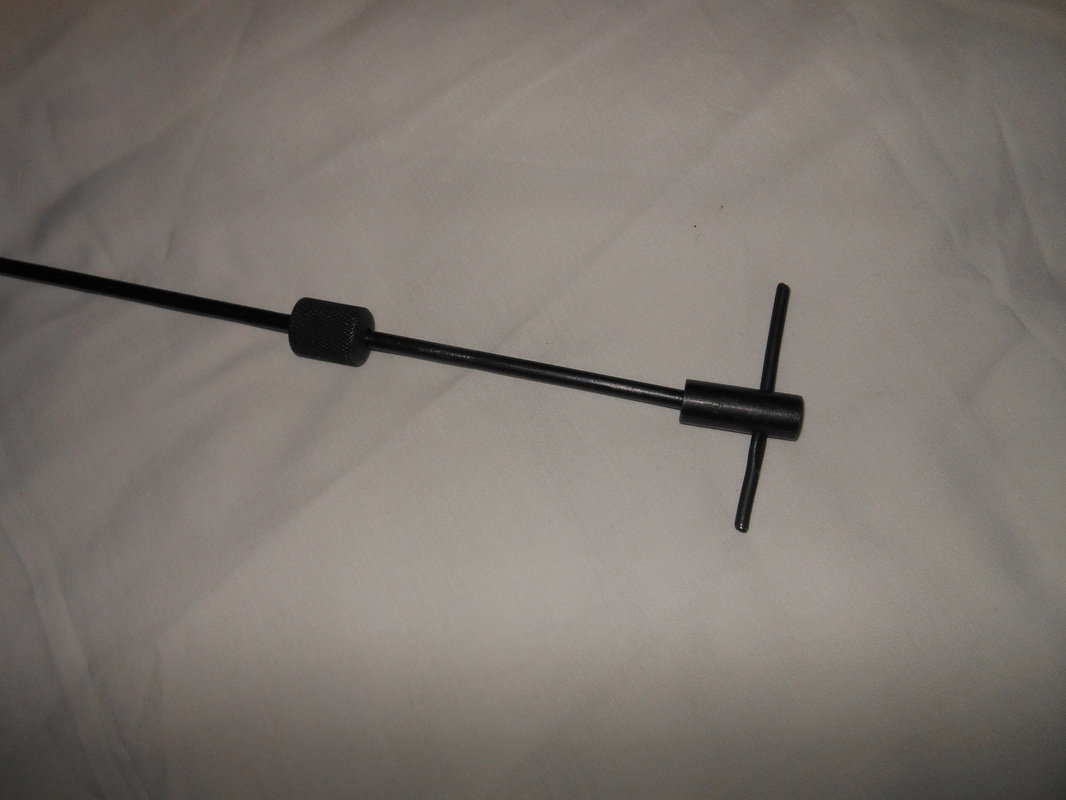
Insert the long end of the metal stock into the hole up to the flattened section and either tap it home or twist the stock to lock it in place. This forms a 'T' piece handle.
|
Through the small aperture on the muzzle protector, slide it onto the rod
|
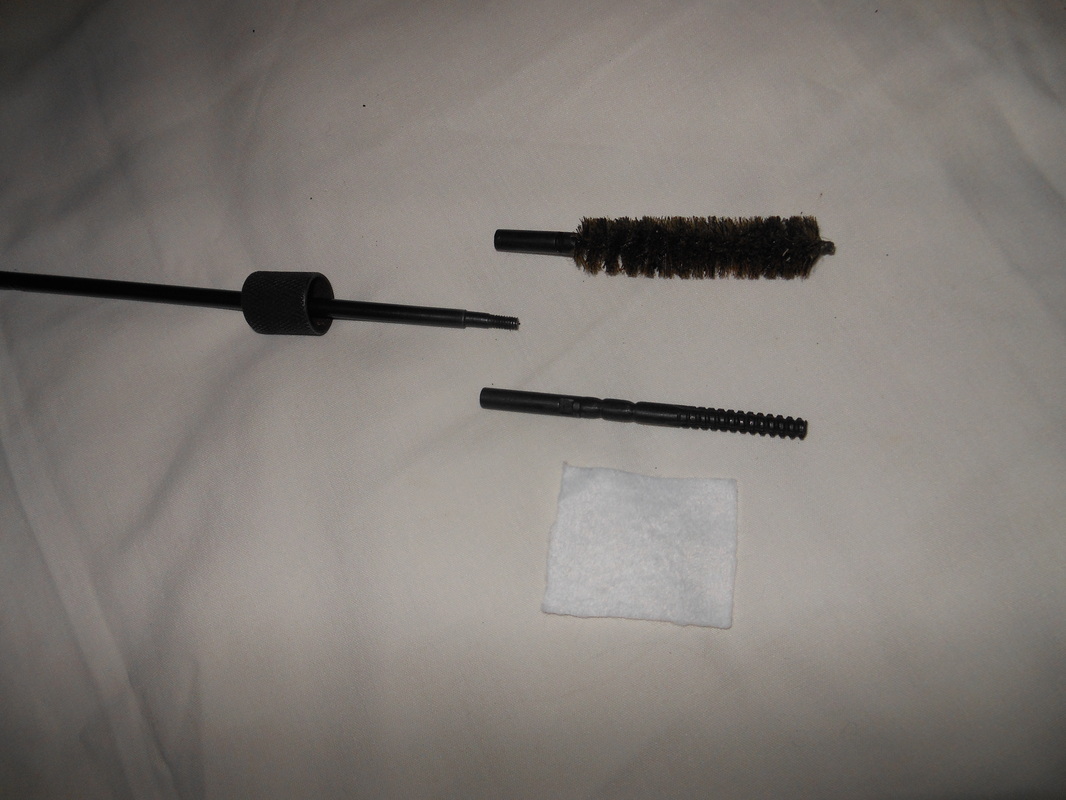
The brush , if available is used to remove heavy deposits of fouling from the barrel. Use the jag with a cleaning swatch to clean and to oil the barrel. Either is screw fitted to the end of the rod.
|
Place the brush or jag into the barrel and slide the muzzle protector over the end of the bore. The rod can be pushed smoothly down the bore. The jag is on a swivel, which when used with a cleaning swatch, allows it to follow the rifling. Push the rod until the brush or jag emerges at the breech. Withdraw the rod back up the barrel and check the bore, before repeating the procedure as necessary.
|
The bolt.
This descriptive is for brief information only. The bolt on the Mosin is unnecessarily complicated and machined, which was due to some extent to patenting issues in the development stages of the weapon. Assembling and disassembling can be somewhat 'fiddlesome' for those not used to doing so, as it involves some simultaneous alignment of various grooves and notches etc. Therefore it is advocated members, unless practiced, do not field strip the bolt. Advice is given on how to check and adjust the firing pin protrusion.
Bolt disassembled.
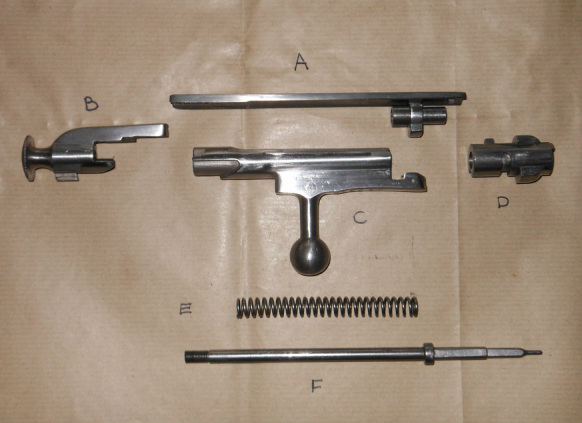
A. Bolt slide.
B. Cocking piece.
C. Bolt body.
D. Bolt head.
E. Firing pin spring.
F. Firing pin.
If any member wishes to receive further instruction on stripping the bolt etc, please refer to John, Brian, Paul or Phil T at any of our events.
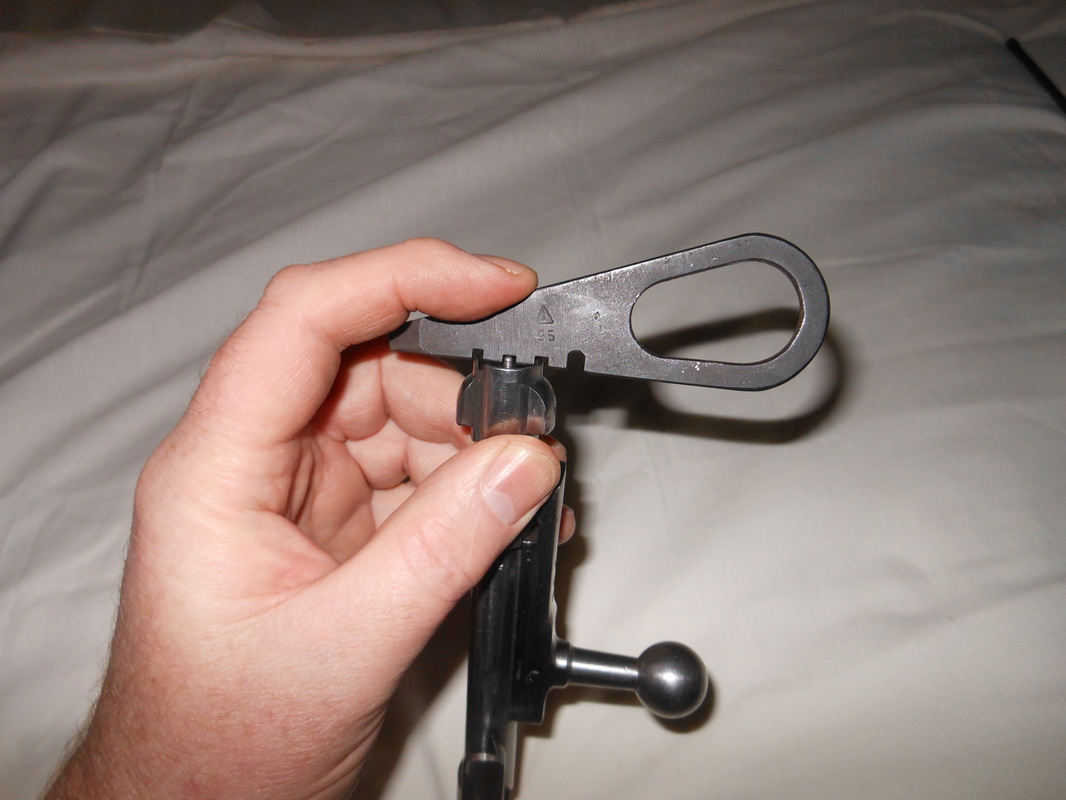
The combination tool has notches along one side, which are used to check the firing pin protrusion, necessary for safe and effective firing. Note: The two outer notches are there to allow the tool to fit over the rim of the bolt face when checking the firing pin. The two central notches are sometimes marked with the figures 75 & 95. The figure 75 is for the correct gauge and the end of the pin should just be touching the top of the notch. If the end of the pin is touching the top of the 95 notch, it is protuding too far and will need adjusting. The image shows the firing pin is correctly adjusted to the 75 notch. The tension on the firing pin spring must released beforehand before testing.
|

Use the flat screwdriver blade on the end the combination tool to adust the firing pin protusion. Turning clockwise, moves the pin out. Turning anti clockwise moves the pin into the bolt head.
|
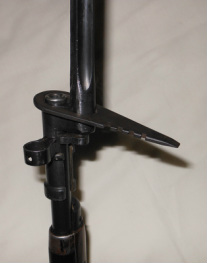
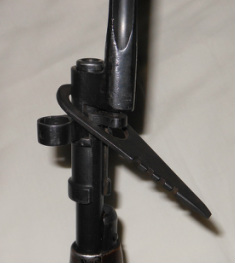
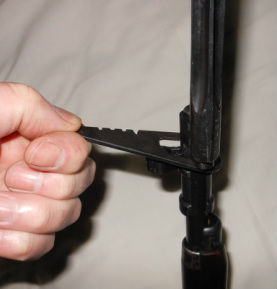
Removing a fouled bayonet from the rifle.
It was common practice for the bayonet to be permanently attached to the rifle. Indeed, the rifle was often sighted and zeroed on the range with the bayonet fitted. In the field, the bayonet fitting became fouled and rusted to the muzzle, making it difficult to remove. The large aperture on the combination tool could be used to release a fouled bayonet.
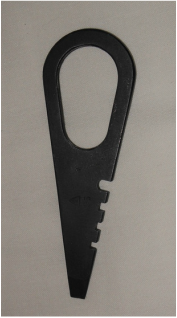
Combination tool showing ovaloid cutout.
|
|
9. Soldiers Army Book
The following notes are a guide to completing the Army Book, which was carried at all times by the soldier.
|

|
Page 2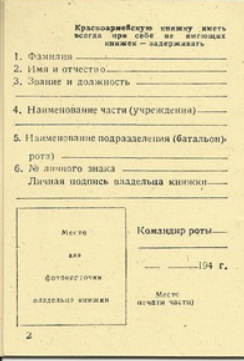
1. Family name.
2. Forename & Patronymic names. 3. Rank function. 4. Recruitment unit. 5. Unit posted to. 6. Soldiers signature. Bottom left: Space for soldiers photograph - taken without head dress. Bottom right: Commanding Officers signature. |
Page 3 General Information.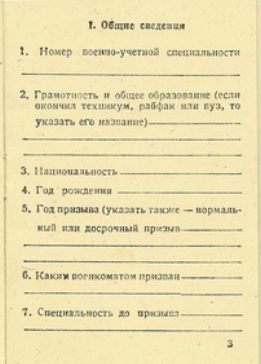
1. Military specialist No.
Example: Infantry- No.s 1-5,5a,6,7,10,11 & 67. 2.Literacy & general education incl. name of any technical schooling attended. 3. Nationality. 4. Year of Birth. 5. Year & Place of recruitment. 6. Name of military registration & recruitment office. 7. Profession or speciality at time of recruitment. |
Page 4.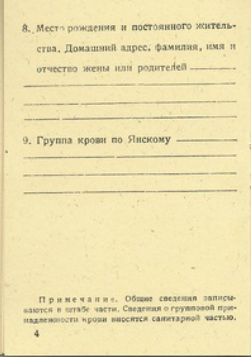
8. Birth place, constant home address, family name, forename & patronymic name of wife or parents.
9. Blood group type. Foot of page: Notes on completion. |
Page 5.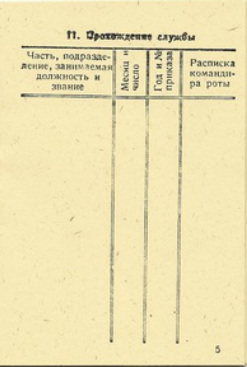
Postings.
1st column: Unit, Division, post & rank. 2nd column: Month & day. 3rd column: Year & order No. 4th column: Commanders signature. |
Page 6.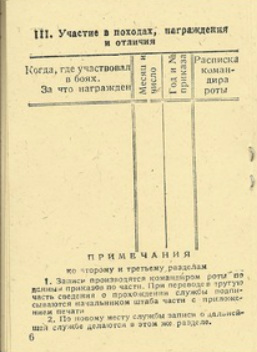
Campaigns, decorations and wounds.
1st column: When, where participated in combat. 2nd column: Month & day. 3rd column: Year and order No. 4th column: Commanders signature. Foot of page: Notes on completion. |
Page 7.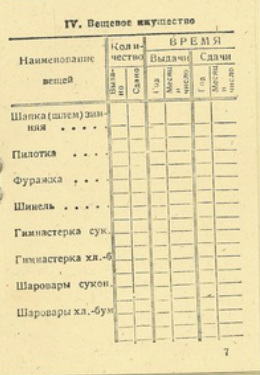
Uniform & Equipment issue. Pages 7 - 10.
1st column: * Ushanka/Winter Schlem. * Pilotka. * Furazkha. * Greatcoat. * Gimnastiorka - wool. * Gimnastiorka - cotton. * Sharovaris - wool. * Sharovaris - cotton. 2nd column: Quantity Issued & returned. 3rd column: Year,Month & Day issued. 4th column: Year,Month & Day returned. Note: Columns 2-4 above are the same on pages 8,9 & 10. |
Page 8.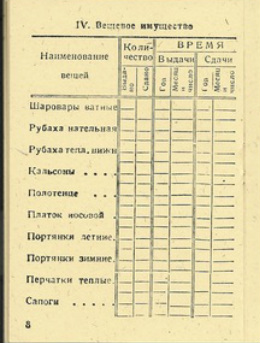
1st column:
* Vatnie sharovaris. * Under shirt - summer. * Under shirt - winter. * Underpants. * Towel. * Handkerchief. * Portyanki foot wraps - summer. * Portyanki foot wraps - winter. * Gloves - warm. * Sapogi boots. Columns 2-3 as page 7. |
Page 9.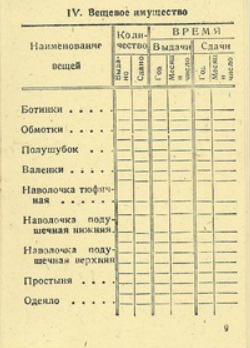
1st column:
* Ankle boots. * Puttees. * Sheepskin coat. * Felt boots. * Mattress cover. * Pillow. * Pillowcase. * Bed sheet * Blanket. Columns 2-3 as page 7. |
Page 10.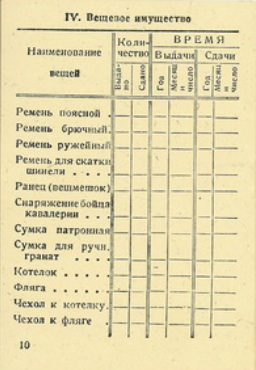
1st column:
* Waist belt. * Trouser belt. * Rifle sling. * Greatcoat strap. * Back pack. * Cavalry equipment. * Ammo pouch. * Grenade pouch. * Mess tin. * Water canteen. * Cover for mess tin. * Cover for water canteen. Columns 2-3 as page 7. |
Page 11.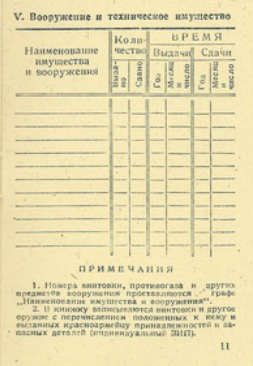
Technical equipment.
1st Column: * Item issued i.e engineer equipt, gas mask etc. Columns 2-3 as page 7. Foot of page: Notes on completion. |
Page 12.
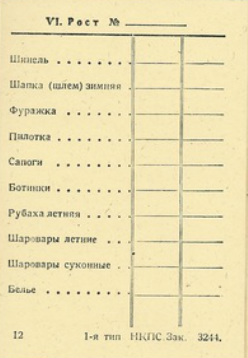
Table of sizes.
1st Column:
For soldier to note personal clothing sizes.
* Greatcoat.
* Ushanka/Schlem.
* Furazhka.
* Pilotka.
* Sapogi boots.
* Ankle boots.
* Undershirt.
* Sharovaris - both summer & winter issue breeches.
* Linen.
Columns 1-2. To note sizes
1st Column:
For soldier to note personal clothing sizes.
* Greatcoat.
* Ushanka/Schlem.
* Furazhka.
* Pilotka.
* Sapogi boots.
* Ankle boots.
* Undershirt.
* Sharovaris - both summer & winter issue breeches.
* Linen.
Columns 1-2. To note sizes